Pages

Friday 30 October 2015

Scots in the 100YW Part 4.

I got the bit between my teeth, and basically finished off all except one element.

Bombard
For some reason, I am finding the bombard particularly challenging to finish. It's an old cast, to which I have added a fuse-wire loop at the rear, and a rope for serfs to drag it back into position with. Perhaps it's because I don't particularly like the model. And I know there is another one on the way from a generous benefactor, from the Corvis Belli range.

Dismounts
The dismounts are all done, including an extra one for the French 'Rich Knights' who can't dismount in DBA, but can in DBMM, plus another extra one as I had a spare few figures.

These are (from Left) - Houston, Melville, Chambers, Hamilton, Norvell, Crighton, Lennx, Galloway, Stewart.
Buchanan, Swinton, Stewart, Blair, Wishart, Kennedy.

 Carmichael, Buchan, and Buchan Man at Arms, La Hire, Marshal La Fayette and Dunois.

Finally, for the dismounts, Buchanan, Swinton and Stewart have snuck in again, then Douglas, Ogilvy and Scrymgeour.
 Some French peasants have snuck into shot! - out!

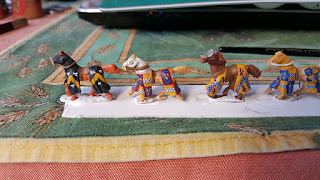
Now, annoyingly, I can't remember who makes these, but they were originally medieval/dark ages archers - in tunics and hose. I added greenstuff to make a great plaid, and beards, and they are now the Highland archers.

 Front view. I actually quite like these, as they are unique. We shall see if they can fight!

Retinue archers. most of the Scots knights who fought on the Continent brought a retinue of men-at-arms plus archers, very similar to the English model. These are painted as including the retinue of Hamilton, Lennox, Chambers and Douglas.

Basing and pennons up next. If only I could steel myself to paint that bombard... 

Thursday 29 October 2015

Scots in the 100YW Part 3.

Since it is much too hot to be outside, I cracked on with some more painting of my DBA/DBMM 100 Years War army. The photographs are a but dull - taken at night, and have highlighted a few places where touch-up is required.. but otherwise, pretty happy.

That's now all the mounted required for a DBA army (I'm using the IV/64c Medieval French list for DBA3), but I am still desperately seeking some additional Corvus Belli 100 YW Knights to round it out to the minimums required for a DBMM2 IV/64 list using the Scots options. If anyone can help, let me know.

Group Shot

Stewart, Lennox & Galloway

Wishart, Blair & Kennedy

Melville, Chambers & Houston

Norvell, Hamilton & Crighton

Pretty happy with these, and the dismounted knights are almost done too. Just the 2 x 3Bw, 1 x 4Bw, Psiloi and an artillery piece to finish. Then base them all up. Easy.

Interestingly, in the more recent DBA3 lists, one of the knights cannot dismount, unlike in the DBMM2 lists where all French & Scottish knights may dismount. Wondering if this exception will be reflected in the revised DBMM 2.1?

Thursday 22 October 2015

Scots in the 100YW Part 2.

Another day, and steady progress...


The cannon I had originally picked out looked much too 'modern' to my eye, and one of the figs originally on the base had very much later (WotR) period armour, so the 4 wheeled bombard at the rear is being prepped for paint. The irregular (in DBA terms, 3Bw) were going to become 'Highland' archers, so out came the green-stuff, and they will now have linen sarks, (often saffron in colour), and a great kilt in a variety of muted tartans..


Virtually finished up the mounted. I still need to wash the 'brass', add highlights to the visible flesh, and add pennons and a banner... as well as the basing of course   I am very happy with these so far.

Wednesday 21 October 2015

Scots in the 100YW

Following the last Canberra based DBA3 competition, I told David the organiser that I would definitely be showing up to the Landwaster competition in November. And made the commitment to bring Scots in the 100 Years War.

There isn't a specific separate Scots on the Continent list, but the Scots at times were the largest part of the Franco-Scots armies. Most were raised by the indenture system and would have been very similar to the English forces of the period, men at arms and archers.

I knew somewhere I had a few packs of the now sadly defunct Corvus Belli 100YW range, and was pretty confident I had enough to build an army. Sources gave me heraldry for the Scots of the period, and as Landwaster is in November, and it's now 'Back to the Future' Day (21 October 2015) - I thought I had better make a start. Riders and dismounted Men at Arms plus sundries such as Bow and Skirmishers were undercoated black, and horses white.

A day later, and here's the horses:


The French - the Marshall, Dunois, and La Hire

 The Scots General - Douglas, Buchan and Carmichael

Scots Knights - Swinton, Stewart and Buchanan.

The horses still need some washes and highlights, but I am pretty happy so far.

Wednesday 14 October 2015

DS Tracks

So Thomo asked about how I work with DS tracks. DS is basically a very soft styrene, so will glue with standard polystyrene glue, but there's a very good chance you will melt through.

Applying the tracks can be tricky, so here's how I do it.

1. First - check the fit of the drive sprocket onto the axle. If you are lucky this will be quite tight. Failing that - you could pad out the axle - or adopt a slightly different approach. But don't attach the sprocket.
2. Check the fit of the sprocket teeth into the track. If its bad, then shave off sprocket teeth as necessary. If this is good, then decide where the join should be, if there are side sponsons then the top of the track run, failing that - aim to have it directly under a wheel.
3. Pre-bend the track (gently) into a rough curve. Apply a small amount of superglue onto the sprocket, and attach the track to about a quarter of the sprocket. Pull taught - watching for curve in the track in the middle. Allow glue to harden.
4. Once set, push the sprocket onto the appropriate axle, don't glue.
5. Now run the bottom of the track along the road wheels to make sure the teeth are aligned and the road wheels straight and level. Adjust as necessary. apply a very small amount of Superglue to the rear of each wheel to fix the track into place along the bottom run.
6. Once set, gently rotate the sprocket to tighten the track between the sprocket and first road wheel. If the sprocket fit is tight, you don't need to glue the sprocket in place - otherwise a small dab of superglue to the rear of the sprocket to fix it in place.
7. Let everything set - it will look like this....

Bottom of a Modelcollect T64
8. Now pre-bend the track at the last road wheel, and carefully wrap round the idler. Glue in place.
9. Bend to shape, and measure the join. DS tracks can be gently stretched, but generally speaking, they are normally a bit longer than you need. Cut as required and glue in final position.

Hope this is useful...


Tuesday 13 October 2015

Cold War Build - WIP

So I thought the USMC deserved a bit of love...   and I had an S&S model M106 Recoilless Rifle, plus the S-Model M151 A2 'Mutt'. Still a Work in Progress, and added S&S crew and camo netting.

The windscreen etc. are just lying in place as I have yet to work out the final assembly sequence, but I reckon it will be a nice little support.

And here's how the Soviet hardware is coming along...
One BMD-1 complete - I tried to get cute with the numbering, as the decal sheet has all the rows of numbers on a single piece of deal sheet, so I thought I could shortcut by using the number 0.. 1.. 2.. but the intervals are too great, and they need to be cut and aligned on the curve of the turret.

The turret on the T64 alone contains about 40 odd parts, some extremely tiny, but I am very happy with progress so far.

A word of warning to those assembling the Modelcollect T64 Model 1975. The instructions are wrong. Step 6 in the instructions would have you assemble the main hull (excluding the glacis), but if you do, you will be unable to attach the lower hull. It needs to be slid under bulges under the main hull, which can't be done once both side sponsons are attached. I would recommend that you attach one sponson only.

This also means that you cant apply paint separately to the running gear and the hull.

The second error is the numbering of the axles. D8 and D4 are (I think) reversed, and won't align properly. Plus D14 and D10, if inserted into the predrilled holes are out of alignment.

No big deal, but it seems a shame, as otherwise it is a very very nice kit.

Sunday 11 October 2015

Soviets! - Cold War Russian Build

So as I mentioned a couple of posts ago, I thought it would be cheap and quick to throw together an OPFOR (Opposition Force) for my US Marine Corps.

The models arrived a couple of days back, the S-Model BMD-1 in their usual 2 kits in a box, the ESCI/Italeri Spetsnatz and a Modelcollect Model 1975 T64.

Now my friend Thomo has just posted about picking up the Dragon Ha-Go WW2 vintage light tank, so I thought I would do a quick comparison.

Here's the Modelcollect T64...   6 sprues, plus DS tracks, plus instructions on building a transparent commanders shield...  Eek!

6 sprues - yet to find any flash...
The observant will notice that there are several turret bases, and a number of variant glacis and sponsons. This kit seems to form the base for several T64 versions, so loads of bits for the spares box! It's a lovely model, but definitely not a quick build.

And since Thomo also seems to be obsessing about the size of the Ha-Go, here's the almost complete BMD-1 with a 20mm fig for scale.


The BMD is a fun build, but there are a couple of traps for young players. I will add a post on the build later.

As for tiny...   try this for size...


Friday 9 October 2015

Valiant 1/1200 Spanish Main

Just received my packet of Valiant Enterprises Spanish Main ships, 2 English Men of War, 4 Pinnaces and 4 Caravels. A big shout out to 'Noble Knight Games' - ordered on 2 October, arrived here in Oz on 9 October! That is great service. Unfortunately they seem to be out of stock of a few of the products in the range.

First impressions of the ships..  nice lines, but a couple of rough casting areas where the mould is a bit 'blurry' - especially on the stern of the smaller ships. These aren't as good as Langton's - or GHQ, but still nice models. It would have been nice for the sails to be separate to the masts, as it is, you will have to be creative with painting, or drill out the section between the bellied sails and the masts themselves.

The RPE Demonworld Empire ships can now be scaled though - here's a shot of the Demonworld largest ship, the Empire Galleon, next to the Valiant English Man o' War.


Looks to be as close to 1/1200 as it can be....

Monday 5 October 2015

Galleys & Galleons Update

So the naval modellers best friend has to be this stuff....


Gloss Acrylic heavy gel. Apply thickly...   use a paint brush, or knife to work in peaks and ripples.


I finished up my models - although I suspect I will be purchasing a few more ships..    I have already sourced some 1/1200 scale Valiant 'Spanish Main' from Noble Knight Games.

These ones still need another couple of coats of the gel. What I normally do is put down a sloppy base colour (this is the old Citadel 'Space Wolves Grey') then add a layer of gel working it into the wave formations I want. I then go back with very thinned down white to pick out the texture, matt varnish everything, then go back and add another thicker coat of gel, focusing on those areas that I have painted white.