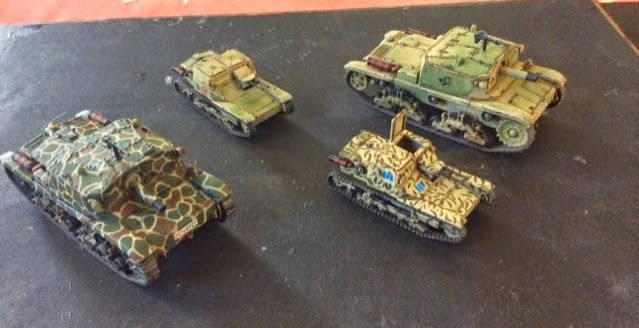
Whose side would you choose? Actually, maybe now we have visual evidence of how Germany managed to keep going till '45 when Italy bowed out earlier...
King Tiger and L33... I thought the comparison might be fun...
Pages
Thursday, 10 July 2014
Wednesday, 9 July 2014
Decals and Lining done
Now I have to start thinking about how far I want to take the weathering.. rust, chipping and rain streaks I think...
Like this... just a filter or dusting to tie it all together I think, and that should do it.
Monday, 7 July 2014
Big Cat Diary - Updated
Having added the cable for the headlamp (fusewire) and a broom bristle aerial to the King Tiger, I hauled out the airbrush (I am still a little scared of it), and started laying down some colour. A mix of Vallejo Middlestone 882 and artists 'Antique White' mixed with some water and some window cleaner.
I then added some more 'Antique White' to the mix and started adding some highlights to the panels. I guess it is what's known as modulation. It's the first time I have tried it, so I kept the effect fairly subtle.
Here's the results:
I am now pondering whether to do the 'ambush' camouflage with the airbrush or by hand. From most of the picture interpretations I have seen, it is usually quite hard edged, though there are quite well known photographs of Schwere Heeres Panzer Abteilung 503 crew applying camouflage to a King Tiger using hand spray guns.
I suppose I should really hand paint the core colours then try to use the airbrush to 'fuzz' the edges. I am not confident about it though, and as I am very happy with the build, I might just stick to handpainting. Back to looking at pictures for inspiration... Might tackle at least one colour tonight.
Colours and base highlights blocked in. Will wait for them to set then varnish. Once that's done.. weathering ;-) - rain streaks, oil spills, dust and chips.
I then added some more 'Antique White' to the mix and started adding some highlights to the panels. I guess it is what's known as modulation. It's the first time I have tried it, so I kept the effect fairly subtle.
Here's the results:
I am now pondering whether to do the 'ambush' camouflage with the airbrush or by hand. From most of the picture interpretations I have seen, it is usually quite hard edged, though there are quite well known photographs of Schwere Heeres Panzer Abteilung 503 crew applying camouflage to a King Tiger using hand spray guns.
I suppose I should really hand paint the core colours then try to use the airbrush to 'fuzz' the edges. I am not confident about it though, and as I am very happy with the build, I might just stick to handpainting. Back to looking at pictures for inspiration... Might tackle at least one colour tonight.
Colours and base highlights blocked in. Will wait for them to set then varnish. Once that's done.. weathering ;-) - rain streaks, oil spills, dust and chips.
The Tank Factory Goes BIG!
So I decided to go from the sublime to the ridiculous, or perhaps in reverse, from the ridiculous (Italian L3/33 Tankette) to the impressive - German King Tiger, or Pzkfpw VI, Ausf B, (with 'Henschel' turret).
This is a Revell kit I have had in my stash for a while, 'OntheWay' website rates it as "One of the very best kits on the market today. Absolutely outstanding kit."
I have been sort of skirting around it for a while. Firstly; because I don't want to be one of those bizarre 'fanboi' nuts who can tell you what some SS Panzer Ace had for breakfast the day he was killed, or have score tables memorised, and secondly, because I wanted to make a good job of the kit, so the smaller and easier vehicles were a good intro. Anyway, I finally 'screwed my courage to the sticking post'.
Handsome looking beast eh? I am going to try a variation on this paint, but very much lighter 'yellow' - the crews themselves applied camo over the factory base colour. It looks like the base colour got bleached quite rapidly, and you should always use a slightly lighter colour for smaller scale models.
Arrrghhh.. the enemy... 6 sprues of handsomely moulded tan plastic, one tiny tiny piece of mould flash to be cleaned off, otherwise perfect. Note the 101 track pieces bottom centre...
And here's all these wheels.. lots of cleaning of sprue attachment points. It's easy to get overenthusiastic and accidentally give them a flat rim. If you do, mark it in pencil and allocate to an axle where the top of the wheel is largely masked by the skirts.
As a reward for cleaning and assembling all the drive-train components (you can see the first set already attached to the lower hull side pieces on the left of the Pic), I allowed myself the luxury of starting on the Turret. Much more fun.
As you can see, the major assemblies are done. I had already dry-fitted (no-glue) the major hull parts together and was happy there would be no problems in getting them assembled correctly. Not attaching the lower hull and drive train to main hull made it much easier to assemble the tracks.
Complete other than tracks. The hanging tracks on the side of the turret were tricky to find good attachment points for. I am surprised that Revell didn't provide 'hangers' for the turret sides to attach them to. They would have been tiny, but not much smaller than some other components.
The Tracks are on! A very fiddly job, with the carpet monster swallowing one whole link. (I only found it today) - As you may notice, I have removed a couple of sections of the schurzen or side-skirts to simulate a bit of wear, so I fabricated a fake track link from one of the removed schurzen and hopefully the substitution wont be too noticeable. I also considered taking one of the turret link-sets and cannibalising that, but as they are cast as doubles it would be very fiddly, and I would have to fabricate hangers for the blank spot.
MEMO - Revell - please please please include a couple of spare track links in future link and length track sprues. It is horrible to think you might have a model ruined simply because you lost or damaged one single tiny component.
Glamour shot. This morning I decided the one noticeable thing missing was the electric cable between the front headlight and the junction box on the deck. I added it with 8A Fusewire, after drilling appropriate holes.
I am rather pleased with the Biggest Cat - it's in the paintshop at the moment, getting the traditional car primer grey undercoat... pics to follow when I feel brave enough to get the airbrush and paint brushes out.
On the whole, a great kit. As I noted above, a couple of omissions, the light cable, plus the hangers for the turret links.
This is a Revell kit I have had in my stash for a while, 'OntheWay' website rates it as "One of the very best kits on the market today. Absolutely outstanding kit."
I have been sort of skirting around it for a while. Firstly; because I don't want to be one of those bizarre 'fanboi' nuts who can tell you what some SS Panzer Ace had for breakfast the day he was killed, or have score tables memorised, and secondly, because I wanted to make a good job of the kit, so the smaller and easier vehicles were a good intro. Anyway, I finally 'screwed my courage to the sticking post'.
Handsome looking beast eh? I am going to try a variation on this paint, but very much lighter 'yellow' - the crews themselves applied camo over the factory base colour. It looks like the base colour got bleached quite rapidly, and you should always use a slightly lighter colour for smaller scale models.
Arrrghhh.. the enemy... 6 sprues of handsomely moulded tan plastic, one tiny tiny piece of mould flash to be cleaned off, otherwise perfect. Note the 101 track pieces bottom centre...
And here's all these wheels.. lots of cleaning of sprue attachment points. It's easy to get overenthusiastic and accidentally give them a flat rim. If you do, mark it in pencil and allocate to an axle where the top of the wheel is largely masked by the skirts.
As a reward for cleaning and assembling all the drive-train components (you can see the first set already attached to the lower hull side pieces on the left of the Pic), I allowed myself the luxury of starting on the Turret. Much more fun.
As you can see, the major assemblies are done. I had already dry-fitted (no-glue) the major hull parts together and was happy there would be no problems in getting them assembled correctly. Not attaching the lower hull and drive train to main hull made it much easier to assemble the tracks.
Complete other than tracks. The hanging tracks on the side of the turret were tricky to find good attachment points for. I am surprised that Revell didn't provide 'hangers' for the turret sides to attach them to. They would have been tiny, but not much smaller than some other components.
The Tracks are on! A very fiddly job, with the carpet monster swallowing one whole link. (I only found it today) - As you may notice, I have removed a couple of sections of the schurzen or side-skirts to simulate a bit of wear, so I fabricated a fake track link from one of the removed schurzen and hopefully the substitution wont be too noticeable. I also considered taking one of the turret link-sets and cannibalising that, but as they are cast as doubles it would be very fiddly, and I would have to fabricate hangers for the blank spot.
MEMO - Revell - please please please include a couple of spare track links in future link and length track sprues. It is horrible to think you might have a model ruined simply because you lost or damaged one single tiny component.
Glamour shot. This morning I decided the one noticeable thing missing was the electric cable between the front headlight and the junction box on the deck. I added it with 8A Fusewire, after drilling appropriate holes.
I am rather pleased with the Biggest Cat - it's in the paintshop at the moment, getting the traditional car primer grey undercoat... pics to follow when I feel brave enough to get the airbrush and paint brushes out.
On the whole, a great kit. As I noted above, a couple of omissions, the light cable, plus the hangers for the turret links.
Saturday, 5 July 2014
First ICM model
So, I finally opened the box for an ICM model. They are made in Eastern Europe (Ukraine I believe) and I bought this one from Martola, a Polish supplier.
So the Martola stuff arrived neatly packed (I also picked up some Dragon and Revell kits at the same time) - and the ICM model was the German Sdkfz 223 radio vehicle. It comes with a wide range of decals (I count rego plates and decals for 8 different vehicles), a small brass etched sprue, and two sprues, one for the basic vehicle and a second one for the aerial.
I have to say, this is a lovely model. The parts are lovely and crisp, the plastic glues well (Italeri take note!) it goes together beautifully, no warping, for example on the hull and upper hull, just a beautiful fit, there is a tiny amount of flash, easily cleaned, and plenty of detail. (For example, wheels are three parts each, tyre, hub and armoured hub protection.)
So here it is, just waiting for the glue to set properly. Would certainly buy ICM again (and use Martola).
And next, I am going to get back into painting some actual figures.. either 15mm Hellenestic or maybe some 20mm Chain of Command.
So the Martola stuff arrived neatly packed (I also picked up some Dragon and Revell kits at the same time) - and the ICM model was the German Sdkfz 223 radio vehicle. It comes with a wide range of decals (I count rego plates and decals for 8 different vehicles), a small brass etched sprue, and two sprues, one for the basic vehicle and a second one for the aerial.
I have to say, this is a lovely model. The parts are lovely and crisp, the plastic glues well (Italeri take note!) it goes together beautifully, no warping, for example on the hull and upper hull, just a beautiful fit, there is a tiny amount of flash, easily cleaned, and plenty of detail. (For example, wheels are three parts each, tyre, hub and armoured hub protection.)
So here it is, just waiting for the glue to set properly. Would certainly buy ICM again (and use Martola).
And next, I am going to get back into painting some actual figures.. either 15mm Hellenestic or maybe some 20mm Chain of Command.
An Update
So I was asked about progress with some of the vehicles I have been putting together, and here's the summary.
Italian Tanks
Have been painting up some Italian tanks. S-Model L3/33 Tankettes, plus Italeri quick-build Semovente
Edit.. the iPad Blogger App seems to have done something weird to the image sizes...
I rather like them.. the Black Watch Lieutenant is for scale.
Subscribe to:
Posts (Atom)